Sunday, 1 December 2013

Experimental Jetset

Experimental Jetset is a small, independent, Amsterdam-based graphic design studio, founded in 1997 by (and still consisting of) Marieke Stolk, Erwin Brinkers and Danny van den Dungen. Focusing on printed matter and site-specific installations, and describing their methodology as “turning language into objects”, Experimental Jetset have worked on projects for a wide variety of institutes. I decided to look at the work as it as they are really minimal but look super nice and really effective. 


I think this could work really well with photography and image as well. All of these posters are successful. I love the use of opacity and colour. I think helvetica would be an ideal font for a frame backing paper.

Friday, 29 November 2013

Crit Feedback

Today's crit we laid our design sheets and the other half of the group left written feedback. We were asked to leave three questions to help people give formative directed feedback. My three questions were: 

  1. What concept works well/not so well? 
  2. What methods would you use to illustrate the concepts? 
  3. Finally, any suggestions? 


Here  is some feedback I found most helpful.
  • "I think the paperclip one is the stronger of the two. But is there a link between stationary and photo frames? Maybe if you make the branding like staples or WHSmith
  • "I think arranging objects as paperclips within the frame is strongest. Although would be a stronger concept if the quantity related to the frame size EG. 7x5 = 35 paperclips" 
  • "Concept of back to uni doesn't work. Why would you want to buy a photo frame when going back to uni" 
  • "Try Hand-rendered type"
  • "I think with the back to uni ideas it would work well if you had a supporting caption as 'take your memories with you" 
  • "I'm not sure about the last concept 'back to uni' doesn't connect with new photos for me..." 
  • "I think that the little illustrations work well and represent holidays successfully. As people usually frame special occasions this is appropriate"
I found today's crit really useful, with this style of crit I find I get a lot more formative feedback. From the feedback I received,  I need to re-think my branding if I am going to be looking at doing stationary, it will be better to look at WHSmith or staples. One comment that kept coming up was the link between stationary and frames, but I think this will be more obvious if the brand was WHSmith. Then there could also be a link between school photographs and school equipment? On my design sheets I didn't make it clear that I meant for students to take frames to their uni rooms to store memories... eg. 'taking memories with you'. 

Thursday, 28 November 2013

Photoshop Workshop

In this workshop we will mainly be working with photo manipulation. It is the main editing program that manipulates photographs. Photoshop works with pixels, which is a square of colour. With pixels things can blur and distort (pixelation) things begin to appear 'blocky'. 


One thing different to vector graphics is that working with pixels we need to think a lot more about size and the quality of an image. Pixelation is a common problem unique to bitmap. Early graphical applications such as video games ran at very low resolutions with a small number of colours, and so had easily visible pixels. This then resulted in sharp edges that gave curved objects and diagonal lines an unnatural appearance.

Resolution is a word to describe the amount of pixels given and information about the image. The most standard resolution given is 72, which is the standard all digital display, as well as a resolution of 300 which is the standard used for print. This is because, it is of high quality that the eye can interpret easily (especially for magazines) however, for a massive bill board alongside the motorway you could probably get away with using a lower resolution and it will still look of high quality. 

Optical Colour Mixing is created through our perception of colour. When we look at two small amounts of different colours laid down side by side the two appear to create a different colour. This colour usually is something similar to the result when the two are mixed in pigment. The only difference is that when two colours are mixed in pigment, they lose some of their intensity. When two colours are mixed optically, they retain their intensity and sometimes appear a lot brighter.


When working in Photoshop the colour mode is pre-set to RGB (red green blue), deals with light and works digitally for the web. CMYK works for print and pigments of inks, when working in this colour mode in Photoshop, you would find not all the filters and options would not be available to use. CMYK refers to the four inks used in some colour printing: cyanmagentayellow, and key (black) To look for different colour modes and change them, you can find them on image-mode-colour mode. 


The RGB colour mode is an additive colour model in which red, green, and blue light are added together in various ways to reproduce a broad array of colours. The name of the model comes from the initials of the three additive primary colours, red, green, and blue.The main purpose of the RGB colour model is for the sensing, representation, and display of images in electronic systems, such as televisions and computers, though it has also been used in conventional photography. Before the electronic age, the RGB colour model already had a solid theory behind it, based in human perception of colours.
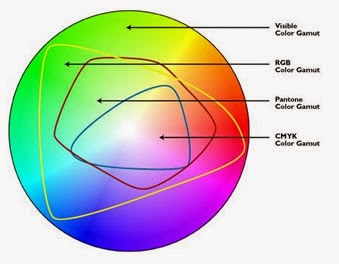
Gamut

With a colour gamut you can see the complete range and scope of colour. One thing, that is really noticeable is that you get a lot more of a wide range of colour when using RGB colour mode, especially a lot more greens. CMYK is a lot more restricted. For example...
CMYK
RGB
From the image examples above, one thing you can really notice, is that the green is a lot brighter when in RGB mode. 

Finally, Photoshop useful shortcuts: 


Wednesday, 27 November 2013

Type Journal- FS Emeric


Today I received this in the post from Fontsmith. The font is FS Emeric designed by Phil Garnham which he spent two years making. It represents his personal journey, that started as a response to an emerging need in brand and graphic design. It is a classic, working sans serif with a distinct individual character, very neutral. Personally, I love it, its clean and friendly, it's geometric yet really expressive. The paper stock which the type is printed on is beautiful, it has a lovely feel to it. It also has vinyl strips which really emphasis the type. 


Monday, 25 November 2013

Studio Brief 1


Primary Research

This afternoon, I went into town and took photographs of existing frames for my primary research as it did seem the most logical step. I went to TK Maxx, M&S, Wilkinson's and Urban Outfitters as I wanted to go to a range of different shops with different prices. 


TK Maxx I found a complete mess, the frames were all over the place, and most of them had random pictures of children or women or something else random. 
Which made me think, something I really need to consider, is how my frame is going to be displayed in the shop (or on the web) and how I can display the frame at its best potential. 
For example, this frame on the left with the new born baby, the frame colour is a delicate blue. The colour compliments the new born, and portrays the idea that this is the best frame suited for your families photos.


Marks & Spencers

M&S had really minimalist and plain backing paper, it was clean and looked elegant on the shelves. However, they seem to have no real effect, your eyes were drawn to the frame not the backing paper. This is something I actually need to consider whether or not I want the customer to be drawn to the frame by having really minimalist backing paper or, something really different and of high impact that draws your eye into the frame. All the frames had the same M&S house style which does work as they look smart on the shelves.


Wilkinsons had a wide range of photo frames at affordable prices. A repeating pattern that keeps coming is that with wooden frames, the backing paper is usually of trees and leaves. The backing paper was really plain and not very interesting.


I found the best frames were in Urban Outfitters, they are spot on. They are highly illustrative and of high impact. They've got there target audience spot on, which I think is around teens to 30's? The backing paper is really eye-catching, sometimes clashing with the frame which only draws your attention in, it makes you really look at the frame (I think it almost compliments the frame). The only thing is I need to use some photographic elements in my backing paper designs. However, something that I really want to explore and consider is the use of hand-rendered typography, which is something I am quite passionate about.  


From my primary research the main thing I learnt was that people, the customer, pay for the frame, we aren't really bothered about the backing paper, as long as we like the look of the frame. However, my initial thoughts about this brief is that I want to make a backing paper of high impact, something you wouldn't expect to see in a frame. 

My Initial Thoughts and Ideas:
  • Photographs you wouldn't expect to see in a frame
  • Pattern 
  • Hand-Rendered Typography 
  • Scanning Techniques ( scanning in textures (sequins/beads)) 


Thursday, 14 November 2013

Summary Evaluation

OUGD403 Evaluation

Over the module, I have learnt a lot and have enjoyed my time at LCA so far. I've learnt a lot about typography, such as, the difference between a font and typeface! as well as learning the terminology behind it. I think this was incredibly useful as it will benefit my knowledge and hopefully my career in the future. 

I found the most challenging brief was to design a typeface for my chosen partner and portraying their personality through a set alphabet with 5 glyphs. However, I am happy with what I produced and I think it does reflect my partner taste in music. 

If I were to have more time on the module I would like re-visit my three posters, because I think I can make them of more high impact and I would really like to get them digitally printed instead of normal paper mounted onto card. 

Overall, I am really pleased with how the module has gone and I look forward to our next. For next time, I would like to experiment more, perhaps with mono or screen print and more hands on techniques.